Technicians Guide
This guide is for volunteer repair technicians. You'll learn how to work with the repair queue, manage repair records, and use Slack commands to stay on top of repairs from anywhere.
Getting Started
Logging In
Navigate to the Equipment Status Board URL in your browser and enter the username and password provided to you by a staff member.
Changing Your Password
If you received a temporary password, change it after your first login:
- Click your username in the top-right corner of the navigation bar
- Select "Change Password"
- Enter your new password and confirm it
Your Default View
After logging in, you land directly on the Repair Queue — a prioritized list of all open repair records. This is your home base.
Working with the Repair Queue
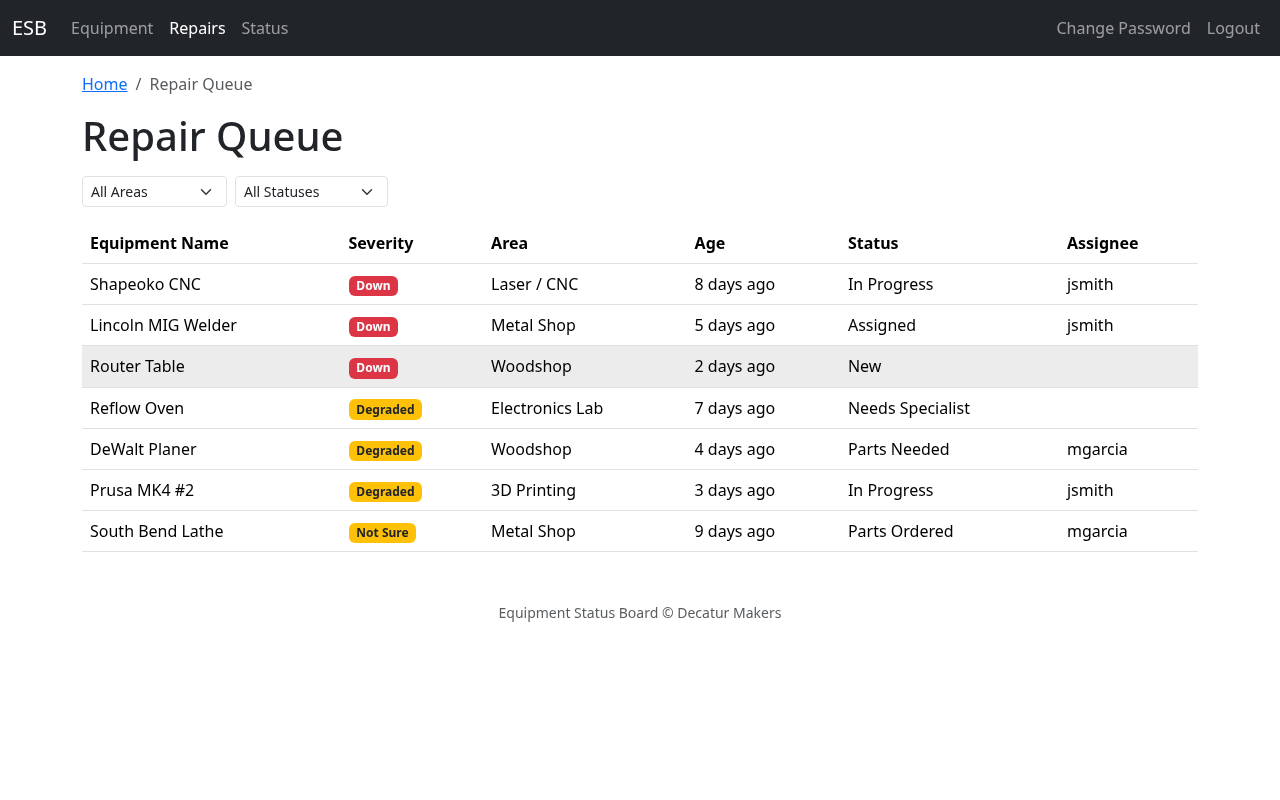
The repair queue shows all open repair records in a sortable, filterable table.
Reading the Queue
Each row shows:
| Column | Description |
|---|---|
| Equipment | Name of the equipment with the issue |
| Severity | Down, Degraded, or Not Sure |
| Area | Which area of the makerspace (e.g., Woodshop) |
| Age | How long since the repair was reported |
| Status | Current repair status (New, In Progress, etc.) |
| Assignee | Who is working on it (if anyone) |
By default, the queue is sorted by severity (Down items first), then by age (oldest first). This puts the most urgent, longest-waiting items at the top.
Sorting
Click any column header to sort by that column. Click again to reverse the sort order.
Filtering
Use the dropdown filters at the top of the queue to narrow the list:
- Area — Show only repairs for a specific area
- Status — Show only repairs in a specific status
- Assignee — Three options: All Assignees (default), Mine (records assigned to you), and Unassigned (records with no assignee).
All three filters work the same way: changing a dropdown narrows the already-loaded list immediately, with no page reload. You can also bookmark or share a pre-filtered URL: ?area=, ?status=, and ?assignee=me|unassigned all apply server-side at page load, so the page comes up with the matching subset already in the table. Dropdown changes after that point refine what's visible but don't update the URL — so a reload reverts to whatever the URL says.
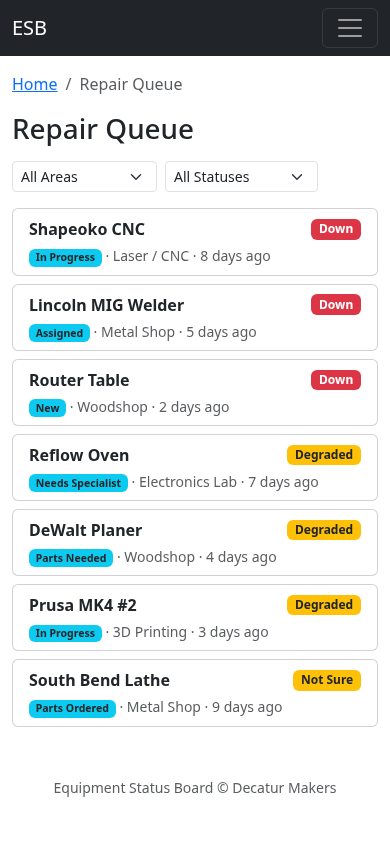
Mobile View
On your phone, the table rows display as stacked cards instead of a table. Each card shows the equipment name, severity, status, area, and age. This makes it easy to browse the queue one-handed while you're at the workbench.
Quick Actions
Each row in the queue includes inline buttons for the two most common technician actions:
- Claim — appears on
Newrepairs you haven't claimed. One click sets you as the assignee and moves the status toAssigned. - Resolve — appears on any open repair that isn't
New. Opens a small modal that asks for a resolution note (required), then sets the status toResolvedand records your note in the timeline.
Both actions are also available from the repair detail page, next to the Edit button.
Managing Repair Records
Opening a Record
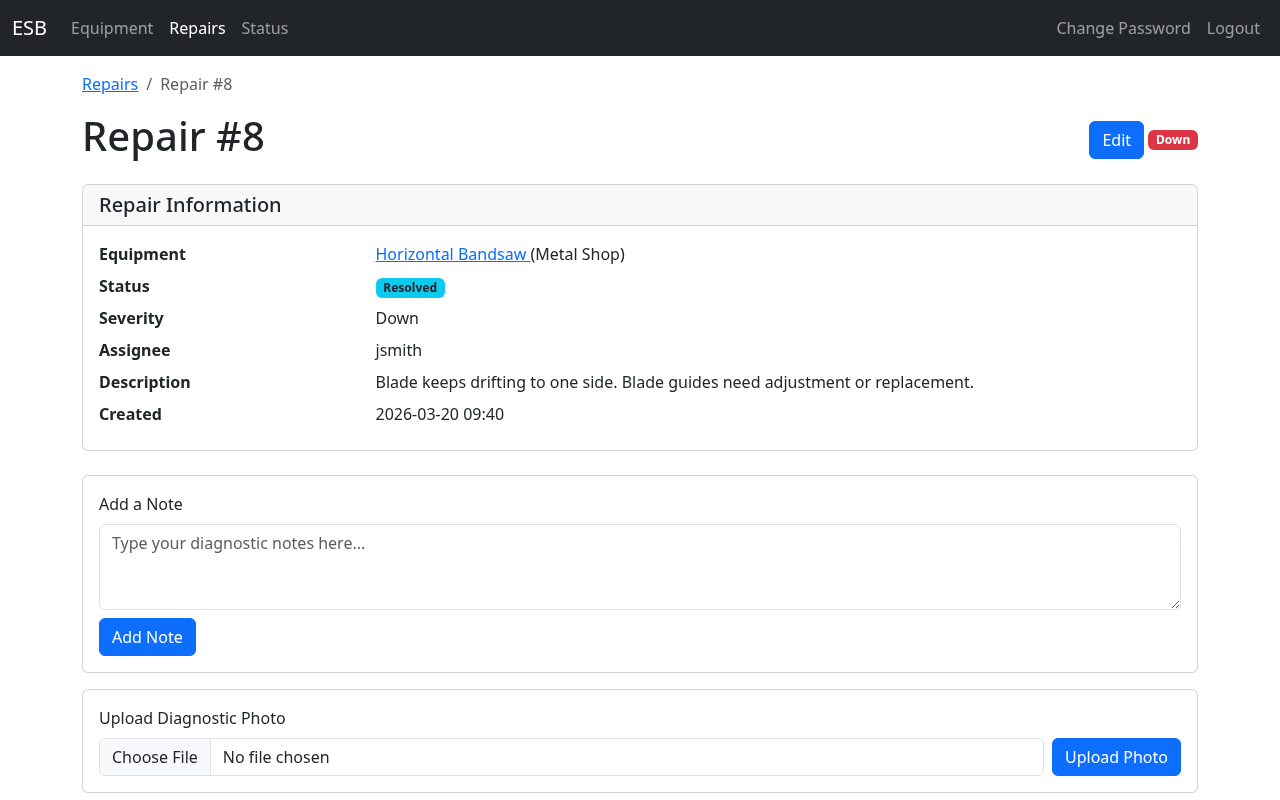
Click or tap any row in the repair queue to open the full repair record.
Reading the Timeline
Every repair record has a timeline — a chronological history of everything that's happened, with the newest entries at the top. The timeline records:
- Notes added by technicians and staff
- Status changes
- Severity changes
- Assignee changes
- ETA updates
- Uploaded diagnostic photos
Each entry includes who made the change and when. This timeline is the institutional memory of the repair — previous diagnostic notes, parts ordered, things already tried — so you don't duplicate work that's already been done.
Adding a Note
Type your note in the notes field and click Save. Your name and a timestamp are recorded automatically. Use notes to document:
- What you found during diagnosis
- What you tried and whether it worked
- Parts needed or ordered
- Anything the next person should know
Uploading Diagnostic Photos
Attach photos from the repair record detail page. Photos appear as thumbnails in the timeline. Useful for documenting damage, part numbers, wiring, or the current state of a repair.
Changing Status
Select a new status from the status dropdown. See Understanding the Repair Workflow below for when to use each status.
Setting Severity
Choose the severity that matches the current state of the equipment:
- Down — Equipment cannot be used at all
- Degraded — Equipment works but has a problem (e.g., accuracy is off, a feature doesn't work)
- Not Sure — You haven't assessed it yet, or the impact is unclear
Assigning
Pick a technician or staff member from the assignee dropdown, or assign the repair to yourself. Assigning helps the team know who's working on what.
Setting an ETA
Use the date picker to indicate when you expect the repair to be complete. This is especially helpful for repairs waiting on parts — it tells staff and other technicians when to expect the equipment back.
Batching Changes
You can make multiple changes at once — update the status, add a note, change the assignee, and set an ETA — all before clicking Save. Everything is saved together in a single action.
Creating Repair Records
Via Web
- Navigate to Repairs > New in the navigation bar
- Select the equipment from the dropdown
- Fill in the description, severity, and any other details
- Click Save
Via Slack — two distinct flows
/esb-repair does two things depending on whether you give it an argument.
Acting on an existing repair via the dispatcher
- Type
/esb-repair(no argument) in any channel. - A modal opens listing every open repair record, grouped by area, showing repair id, equipment, status, severity, and assignee.
- Pick one and click Continue.
- A second modal opens with one Action radio plus optional ETA / status / note inputs:
- Claim (assign to me) — sets you as the assignee. If the repair was still
New, status moves toAssigned; on any later open status, claim only changes the assignee. - Set ETA — pick a date. Required when chosen.
- Set Status — pick
In Progress,Closed - Duplicate, orClosed - No Issue Found. Required when chosen. - Resolve with Note — sets status to
Resolvedand appends the note you provide. Note is required.
The dispatcher is the easiest path for routine in-Slack work — you no longer need to know a repair id to act on something.
Creating a new repair via Slack
- Type
/esb-repair <equipment name>in any channel — you must supply an argument; the no-args form goes to the dispatcher described above. - The create-record modal opens. If the equipment name matches exactly one piece of equipment (case-insensitive), it is pre-selected for you.
- Fill in description, severity, and any other details, then submit.
If the argument matches zero or multiple pieces of equipment (or matches only as a partial substring), the modal opens without a preselection and you pick from the dropdown.
Using Slack Commands
| Command | What It Does |
|---|---|
/esb-report |
Quick problem report — same form as the member QR page report. Use this when you want to file a member-style report from Slack. |
/esb-status |
Check status. No args summarises all areas (with non-green equipment listed beneath each area count). /esb-status <area name> shows full detail for one area; /esb-status <equipment name> shows one item. |
/esb-repair |
Technician dispatcher. No args lists open repairs you can claim, set ETA, change status, or resolve with a note. With an equipment name, opens the create-record modal (equipment is pre-selected when the name matches exactly). |
/esb-update <id> |
Update an existing repair record in depth — change status, add notes, set severity, assignee, or ETA. Use this when the dispatcher's four quick actions aren't enough. |
Slack notification emojis
Outbound notifications and ephemeral messages start with a small fixed legend so events are visually distinguishable at a glance:
:rotating_light:— a new problem report (no safety risk).:warning: *SAFETY RISK* :warning:— safety-risk prefix on a new report or severity change. Replaces the non-safety emoji when the report is flagged as a safety risk.:wrench:— repair severity changed.:arrows_counterclockwise:— repair status changed between open states (e.g.New→In Progress). Also appears on dispatcher confirmations for Claim and Set Status (when the new status is not a closure).:calendar:— ETA set or changed.:white_check_mark:— repair resolved or closed (any closure:Resolved,Closed - Duplicate,Closed - No Issue Found). Also generic success confirmations.:x:— error / not-found ephemeral messages.
Viewing Equipment Details
Equipment Registry
Browse all equipment in the system via the navigation bar. You can view equipment details including:
- Equipment name, manufacturer, model, and area
- Uploaded documents (owner's manuals, service manuals, quick start guides)
- Equipment photos
- External links (product pages, support sites, training materials)
Editing Documentation
If enabled by staff, you can upload documents, photos, and add links to equipment records. This is useful for adding service manuals, wiring diagrams, or other reference material you find during repairs.
Understanding the Repair Workflow
Each repair record progresses through a series of statuses. Here's when to use each one:
| Status | When to Use |
|---|---|
| New | Just reported, not yet assessed by anyone. This is the starting status for all reports. |
| Assigned | Someone has taken responsibility for this repair. Use this when you pick up a repair from the queue. |
| In Progress | You are actively working on diagnosing or fixing the issue. |
| Parts Needed | Diagnosis is complete and you've identified parts that need to be ordered or sourced. |
| Parts Ordered | Parts have been ordered. Add a note with order details and expected delivery. |
| Parts Received | Parts are in hand and ready to install. |
| Needs Specialist | The repair requires expertise or tools beyond what's currently available. Add a note explaining what's needed. |
| Resolved | Repair is complete. The equipment is back to working condition. |
| Closed - No Issue Found | You investigated and could not reproduce or find a problem. |
| Closed - Duplicate | This issue is already tracked in another repair record. Add a note referencing the other record. |